Categories
Jmeter Performance Testing testing

Apache JMeter HTTP(S) Test Script Recorder

In this tutorial we are planning to explain step by step on how to record HTTP/HTTPS sessions.

Setup Instructions

  1. Go to JMETER_HOME/bin and start JMETER with jmeterw.cmd and jmeter in linux/unix.
  2. Select “Test Plan”, right click on “Test Plan” and add a new thread group: Add > Threads  (Users) > Thread Group.

image

3.  Select “Thread Group” right click, “Add –> Config Element –> HTTP Request Defaults”

image

4.  In new HTTP Request Defaults element: Server name – enter “host to be tested”, path can be left blank.

image

5. Right click on the “Thread Group” and add a recording controller: Add > Logic Controller >Recording Controller.

image

6.  Next, select WorkBench, Right click on WorkBench and add the recorder: Add -> Non-Test Elements -> HTTP(S) Test Script Recorder

image

7. On HTTP(S) Test Script Recorder, click the “Add” button in “URL Patterns to Include”. This will create a blank entry; enter “.*.html”. you can specify URL patterns to include and exclude such as *.html, *.js, which you would like to record.

image

8.  Right click on “HTTP(S) Test Script Recorder” and add a listener: Add -> Listener –> View Results Tree

image

9. Return to HTTP(S) Test Script Recorder, and click the “Start” button at the bottom.

This will start the JMeter proxy server which is used to intercept the browser requests. A file called ApacheJMeterTemporaryRootCA.crt will be generated in jmeter/bin folder. Install this certificate in your browser.

Note: If you browser already uses a proxy, then you need to configure JMeter to use that proxy before starting JMeter, using the command-line options -H and -P.

Configure Firefox To Use JMeter Proxy

We will use Firefox as our browser when using the JMeter HTTP(S) Test Script Recorder because, unlike Chrome and some other browsers, it does allows you to override system-wide configuration for its proxy settings.

Configure Firefox to use localhost (127.0.0.1) on port 8080 as its proxy for all traffic by following these steps:

  1. Open Firefox
  2. Go to the Preferences menu
  3. Click on the Advanced tab
  4. Then Network tab
  5. In the “Connection” section, click on “Settings…”
  6. Select the “Manual proxy configuration” radio button
  7. Set HTTP Proxy to “localhost” and Port to “8080”
  8. Check “Use this proxy server for all protocols”
  9. Click OK and exit the Preferences menu

Note: When Firefox is configured to use JMeter’s Script Recorder as a proxy, it will only work properly if the Script Recorder is running.

Recording HTTP Requests

Now that our test plan’s HTTP(S) Test Script Recorder is running, and Firefox is configured to use it as a proxy, the HTTP requests that Firefox sends will be recorded. Let’s test it out.

In Firefox, go to your server’s homepage (the same server that you configured in your JMeter HTTP Request Defaults):

http://your_domain.com/

Now there should be a little triangle next to your Recording Controller. Click on it to expand and show the requests that it has recorded. You should see the HTTP requests that were recorded, depending on which URL Patterns you have included and excluded. Feel free to browse your site to record more requests.

As you can see, a lot of requests were created. You may refine the list of HTTP requests by simply deleting unwanted entries here.

If you do not see any entries under your Recording Controller, you will want to review your URL Patterns in the HTTP(S) Test Script Recorder (Hint: Remove all includes and excludes to record everything).

Once you are done recording, click the “Stop” button at the bottom of the HTTP(S) Test Script Recorder window. Note that Firefox will no longer be able to reach any pages (because it is configured to use port 8080 as a proxy)–configure it to use “No proxy” if you want to function normally.

Run Your Test Plan

Once you are happy with the test plan you have recorded, save it, then run it. It will function exactly like a manually created test, so you can configure it, delete, and add items to make it match your desired test case more closely.

Categories
testing

What’s WSDL?

Web Service Definition Language in short WSDL is an XML format for describing network services as a set of endpoints operating on messages containing either document-oriented or procedure oriented information.

WSDL is a

  • XML document written to describe a web service.
  • It specifies the location of the web service and the operations or methods the web service exposes.

A WSDL document uses the following elements in the definition of network services (Web services)

  • Types – a container for data type definitions. This describes the data. The XML schema Language(Known as XSD also) is used for this purpose.
  • Message – an abstract, typed definition of the data being communicated. The contains the information needed to perform the operation.
  • Operation – an abstract description of an action supported by a service. This defines the actions and the way the message is encoded.
  • Port Type – an abstract set of operations supported by one or more endpoints.
  • Binding – a concrete protocol and data format specification for a particular port type. Defines the interface and the binding style.
  • Port – a Single endpoint defined as a combination of a binding and a network address. It defines the address or the connection point to a web service.
  • Service – a collection of related endpoints
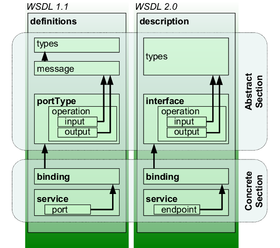
Representation of concepts defined by WSDL 1.1 and WSDL 2.0 documents.

WSDL 1.2 has been renamed to WSDL 2.0,  because of the major differences, like

  • Removed message constructs.
  • Operator overloading not supported.
  • PortTypes renamed to interfaces.
  • Ports renamed to interfaces.
  • Added further semantics to the description language. 
<?xml version="1.0" encoding="UTF-8"?>
<description xmlns="http://www.w3.org/ns/wsdl" 
             xmlns:tns="http://www.tmsws.com/wsdl20sample" 
             xmlns:whttp="http://schemas.xmlsoap.org/wsdl/http/"
             xmlns:wsoap="http://schemas.xmlsoap.org/wsdl/soap/"
             targetNamespace="http://www.tmsws.com/wsdl20sample">

<!-- Abstract type -->
   <types>
      <xs:schema xmlns:xs="http://www.w3.org/2001/XMLSchema"
                xmlns="http://www.tmsws.com/wsdl20sample"
                targetNamespace="http://www.example.com/wsdl20sample">

         <xs:element name="request"> ... </xs:element>
         <xs:element name="response"> ... </xs:element>
      </xs:schema>
   </types>

<!-- Abstract interfaces -->
   <interface name="Interface1">
      <fault name="Error1" element="tns:response"/>
      <operation name="Opp1" pattern="http://www.w3.org/ns/wsdl/in-out">
         <input messageLabel="In" element="tns:request"/>
         <output messageLabel="Out" element="tns:response"/>
      </operation>
   </interface>

<!-- Concrete Binding Over HTTP -->
   <binding name="HttpBinding" interface="tns:Interface1" 
            type="http://www.w3.org/ns/wsdl/http">
      <operation ref="tns:Get" whttp:method="GET"/>
   </binding>

<!-- Concrete Binding with SOAP-->
   <binding name="SoapBinding" interface="tns:Interface1" 
            type="http://www.w3.org/ns/wsdl/soap" 
            wsoap:protocol="http://www.w3.org/2003/05/soap/bindings/HTTP/"
            wsoap:mepDefault="http://www.w3.org/2003/05/soap/mep/request-response">
      <operation ref="tns:Get" />
   </binding>

<!-- Web Service offering endpoints for both bindings-->
   <service name="Service1" interface="tns:Interface1">
      <endpoint name="HttpEndpoint" 
                binding="tns:HttpBinding" 
                address="http://www.example.com/rest/"/>
      <endpoint name="SoapEndpoint" 
                binding="tns:SoapBinding" 
                address="http://www.example.com/soap/"/>
   </service>
</description>


Example WSDL

Categories
Performance Testing testing

Websphere MQ

As per IBM notes

IBM WebSphere MQ can transport any type of data as messages, enabling businesses to build flexible, reusable architectures such as service-oriented architecture (SOA) environments. It works with a broad range of computing platforms, applications, web services and communications protocols for security-rich message delivery. WebSphere MQ provides a communications layer for visibility and control of the flow of messages and data inside and outside your organization.”

WebSphere MQ provides:

  • Versatile messaging integration from mainframe to mobile that provides a single, robust messaging backbone for dynamic heterogeneous environments.
  • Message delivery with security-rich features that produce auditable results.
  • High-performance message transport to deliver data with improved speed and reliability.
  • Administrative features that simplify messaging management and reduce time spent using complex tools.
  • Open standards development tools that support extensibility and business growth

More details can be availed from IBM website

dist_400px


For more information on Load testing IBM Websphere MQ using Jmeter check here.

Categories
Linux Interview questions testing

Symmetric Encryption Vs Asymmetric Encryption

Symmetric Encryption

  • Symmetric encryption is the oldest and best-known technique.
  • A secret key, which can be a number, a word, or just a string of random letters, is applied to the text of a message to change the content in a particular way.This might be as simple as shifting each letter by a number of places in the alphabet.
  • Symmetric encryption uses the identical key to both encrypt and decrypt the data. 
  • As long as both sender and recipient know the secret key, they can encrypt and decrypt all messages that use this key.

Examples of Symmetric Encryption includes: DES, Triple-DES (3DES), IDEA, CAST5, BLOWFISH, TWOFISH.

Asymmetric Encryption

  • This encryption technique is born from the disadvantage of Symmetric Encryption.
  • Asymmetric encryption, in which there are two related keys–a key pair(A public Key and a Private Key). 
  • A public key is made freely available to anyone who might want to send you a message. A second, private key is kept secret, so that only you know it. 
  • Any message (text, binary files, or documents) that are encrypted by using the public key can only be decrypted by applying the same algorithm, but by using the matching private key. 
  • Any message that is encrypted by using the private key can only be decrypted by using the matching public key.

Examples of Asymmetric Encryption includes: RSA, DSA.

Categories
Performance Testing testing

Loadtesting Websphere IBM MQ server using JMETER


 About :

For Loadtesting Apache Active MQ , JMS-Point-to-Point sampler in Jmeter will help us. Think that you do not have JNDI settings and no apache activemq for JMS messaging, instead IBM Websphere MQ is in place.  One day your manager is coming and asking you to test IBM MQ using open source testing tool as they do not ready to pay for small scale performance testing.

In that case , here is the steps to use Jmeter to load test IBM Websphere MQ.
The content here is pretty much precious and definitely it will save your valuable time 🙂

  • Below are the Java and MQ jars needed.  Download these jar files and place it under Jmeter’s libext directory. ‘jmeter-jms-skip-jndi-0.0.1.jar‘ is the jar contains the MQ declaration and coding to connect it. You can down it from the URL :http://www.java2s.com/Code/Jar/j/Downloadjmeterjmsskipjndi001jar.htm
    • com.ibm.mq.jar
    • org.springframework.beans.jar
    • org.springframework.jms.jar
    • javax.jms.jar
    • jmeter-jms-skip-jndi-0.0.1.jar
    • spring-core.jar
  •  Open Jmeter -> File-> New->TestPlan -> Add Thread Group
  • Under Thread Group add Samplers->JMS Point-to-Point Sampler and configure the parameter. As given in the below Screenshot.
  •  Run Jmeter Script and Enjoy IBM MQ load testing .

MQ1

Categories
testing

What’s JSON?

JSON (JavaScript Object Notation) is a lightweight data-interchange format. It is easy for humans to read and write.

JSON is built on two structures:

  • A collection of name/value pairs. In various languages, this is realized as an object, record, struct, dictionary, hash table, keyed list, or associative array.
  • An ordered list of values. In most languages, this is realized as an array, vector, list, or sequence.

Here’s a sample json file.

{
    "glossary": {
        "title": "example glossary",
		"GlossDiv": {
            "title": "S",
			"GlossList": {
                "GlossEntry": {
                    "ID": "SGML",
					"SortAs": "SGML",
					"GlossTerm": "Standard Generalized Markup Language",
					"Acronym": "SGML",
					"Abbrev": "ISO 8879:1986",
					"GlossDef": {
                        "para": "A meta-markup language, used to create markup languages such as DocBook.",
						"GlossSeeAlso": ["GML", "XML"]
                    },
					"GlossSee": "markup"
                }
            }
        }
    }
}
Categories
Linux technews testing

Installing Java and Setting JAVA_HOME

For any applications built around java requires JAVA_HOME variable to be set, here is how to setup JAVA_HOME for both Linux/Unix and windows environment.

To Install the JDK Software and Set JAVA_HOME on a UNIX System

  1. Install the JDK software.
    1. Go to http://java.sun.com/javase/downloads/index.jsp.
    2. Select the appropriate JDK version and click Download.The JDK software is installed on your computer, for example, at /usr/jdk/jdk1.6.0_02. You can change this location.
  2. Set JAVA_HOME.
    • Korn and bash shells:
      export JAVA_HOME=jdk-install-dir
      export PATH=$JAVA_HOME/bin:$PATH
    • Bourne shell:
      JAVA_HOME=jdk-install-dir
      export JAVA_HOME
      PATH=$JAVA_HOME/bin:$PATH
      export PATH
    • C shell:
      setenv JAVA_HOME jdk-install-dir
      setenv PATH $JAVA_HOME/bin:$PATH
      export PATH=$JAVA_HOME/bin:$PATH

To Install the JDK Software and Set JAVA_HOME on a Windows System


  • Install the JDK software.
    1. Go to http://java.sun.com/javase/downloads/index.jsp.
    2. Select the appropriate JDK software and click Download.The JDK software is installed on your computer, for example, at C:Program FilesJavajdk1.7. You can move the JDK software to another location if desired.
  • Set JAVA_HOME:
    1. Right click My Computer and select Properties.
    2. On the Advanced tab, select Environment Variables, and then edit JAVA_HOME to point to where the JDK software is located, for example, C:Program FilesJavajdk1.7.

JAVA_windows

Categories
Linux technews testing

Testing Ubuntu Touch Images

Ubuntu touch images are now available for testing on the isotracker. And further, the images are now raring based! As such, the ubuntu touch team is asking for folks to try out the new images on there devices and ensure they are no regressions or other issues.

There are 4 product listings representing each of the officially supported devices; grouper (nexus 7), maguro (galaxy nexus), mako (nexus 4), and manta (nexus 10).You can help by installing the new images following theinstallation instructions, and then reporting your results on the isotracker.

App-dev-tablet-GoMobilehere are handy links for download and bug information at the top of the testcases to help you out. If you do find a bug, please use the instructionsto report it and add it to your result. Never used the tracker before? Take a look at this handy guide or watch the youtube version.

Once all the kinks and potential issues are worked out (your feedback requested!) the raring based images will become the default, and moving forward, the team will continue to provide daily images and participate in testing milestones as part of the ‘s’ cycle.

Happy testing 🙂